

Ajax introduction, Json, XML
Ajax or Asynchronous JavaScript and XML is a technology that allows us to download and send some data without reloading the entire page.
Before we get to work with Ajax, we have to go through a bit of theory, which we will constantly scroll through when working with ajax.
HTTP protocol
Most of the Internet is based on the HTTP protocol. But how does it actually work? The browser sends a request to the server along with its headers. These headers include information such as the type of browser, what types of data it supports, the type of cache, etc.
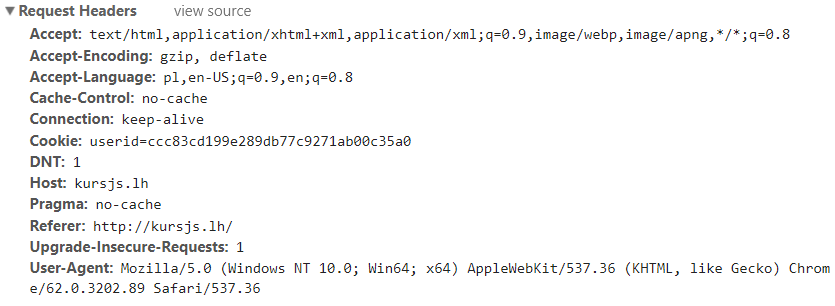
The server receives this request, processes it and then sends a response (eg page code, graphics code) preceded by appropriate headers, data type (eg hey – I just sent you the graphic) and the status of the answer (eg 200, 404, 301, 500). The most common response statuses are:
| 200 | All ok, succesfull connection |
|---|---|
| 301 | The site has been move to a diffrent address |
| 404 | The site doesn’t exist |
| 418 | I am a tea pot |
| 500 | Internal server error |
The browser gets the answer that is the headers and the body of the answer.

Begins to read the body of the answer.
It comes to the moment where, for example, the styles are attached to the page using the link.
The browser sends another request (including headers), the server processes them and sends them back with their headers.
In these attached styles, the author used @import, which is used to attach other css files.
The browser encounters such @include and again sends the appropriate request to the appropriate server.
But still in the code, the author placed img graphics. Browser encounters them and again – sends the appropriate rownia, and in response gets a result.
This result depends on what the server sends. And so in a circle, until the entire document will not be loaded …
In the above description, several things are of particular importance.
The first of these is the status, that is, whether the connection has been successful (202) or,
for example, failure, because the address does not exist (404).
The second very important header is Content / type, which specifies the MIME type of the data.
If, for example, the server sends us the html page, but as the text / plain type, then in our browser the page will be displayed as a text file.
Similarly with the rest of the resources – when the server sends graphics png as text / plain, in our browser we will see a text trash.
Going forward, our server could send a php script as png – just send it with the image / png headers
The third very important property of each connection is its type.
Each connection can be of some type.
If you enter the debugger and the Network tab and then refresh this page, you’ll see that most connections will be GET.
Because we’re downloading data. There are several such types:
| GET | This type of connection is used to retrieve data. You can also use it to send data. Then, this data is attached to the website address. This type is used to work on a relatively small amount of data, because the number of letters in the address is about 2000, so the data can not be very long |
|---|---|
| POST | most often used to send more data. this type of data is attached to the body of the request, not to the address of the page |
| PUT | connection type that says we want to update an object on the server. Most often used to edit several properties, e.g. user |
| PATCH | Similar to PUT, except that it is used to edit / update a specific object’s property on the server – e.g. user’s name |
| DELETE | Specifies the type of connection used to delete data |
The last (the last one I will describe here) the property of such connections is that they are stateless.
This means that one connection does not know anything about the second connection. They are like separate beings.
Sure – in our application we can keep any variables etc. that collect data. But the connections themselves do not know anything.
For them, it is not totally important.
REST
We discussed the types of connections above. The next topic that we will scroll through when working with Ajax will be REST or Representational State Transfer. What is that? A convention, pattern, and basically citing Wikipedia’s style of architecture Imagine that in order to download / send data we will dynamically connect to the following address:
const ourApiUrl = "http://codingnotes.eu/heros";| Metoda HTTP | Adres | Opis |
|---|---|---|
| GET | http://codingnotes.eu/heros | Downloading the entire list of heroes |
| GET | http://codingnotes.eu/heros/1 | Get hero data with id 1 |
| POST | http://codingnotes.eu/heros | Sending a new hero |
| PUT | http://codingnotes.eu/heros/1 | Update / edit hero with id 1 |
| PATCH | http://codingnotes.eu/heros/1 | Update one hero’s property with id 1 |
| DELETE | http://codingnotes.eu/heros/1 | Removal of the hero with id 1 |
Now if you give me the address “http://codingnotes.eu/heros” then I, knowing that you use REST, I can assume that when I want to add a new user, I should send data using a POST link to the address “” http: // kursjs .pl / heroes. “But by editing some user’s data, I will probably send the data using PATCH to the address” http://codingnotes.eu/heros/jakies_id. “Sure – I would not go without a description, but at least I can make some assumptions. .. A very nice article on this subject can be found at https://www.smashingmagazine.com/2018/01/understanding-using-rest-api/.
XML
Asynchronous JavaScript and XML – do you see this tip? It means that our dynamic connections will mainly operate on XML.
Actually – it was like that at the beginning. When this technology was created, the main format of transmitted data was XML.
The problem with this format is that, firstly, its recording is quite long, so by sending small data we have almost double the overhead of the transmitted information just because the syntax of XML is not concise:
<?xml version="1.0"?>
<catalog>
   <book id="bk101">
      <author>Gambardella, Matthew</author>
      <title>XML Developer's Guide</title>
      <genre>Computer</genre>
      <price>44.95</price>
      <description>An in-depth look at creating applications
      with XML.</description>
   </book>
   <book id="bk102">
      <author>Ralls, Kim</author>
      <title>Midnight Rain</title>
      <genre>Fantasy</genre>
      <price>5.95</price>
      <description>A former architect battles corporate zombies</description>
   </book>
</catalog>
See how many entries in the above we have lost on the markers themselves. In addition to the long record, downloading such data is similar to a tree walk in the house, which is also not the most pleasant thing in the world - especially when you're working on a lot of data. Below is a very simple example, and we already have to use quite complicated entries:
function loadDoc() {
var xhttp = new XMLHttpRequest();
xhttp.onreadystatechange = function() {
if (this.readyState == 4 && this.status == 200) {
myFunction(this);
}
};
xhttp.open("GET", "books.xml", true);
xhttp.send();
}
function myFunction(text) {
const parser = new DOMParser();
const xmlDoc = parser.parseFromString(text.response, "text/xml");
const books = xmlDoc.querySelectorAll('book');
[].forEach.call(books, function(book) {
const title = book.querySelector('title').firstChild.nodeValue;
const author = book.querySelector('author').firstChild.nodeValue;
const genre = book.querySelector('genre').firstChild.nodeValue;
const price = Number(book.querySelector('price').firstChild.nodeValue);
const description = book.querySelector('description').firstChild.nodeValue;
console.log(title, author, gender, price, description);
});
}
loadDoc();JSON
So how do you see the XML works, but the fun with it is not the most pleasant. That is why the JSON format was created, which simplified the work on the transmitted data very much.
The JSON format is similar to classic literals in JS
{
    "catalog" : [
        {
            "id" : "bg101",
            "author" : "Gambardella, Matthew",
            "title" : "XML Developer's Guide",
            "genre" : "Computer",
            "price" : 44.95,
            "description" : "An in-depth look at creating applications with XML."
        },
        {
            "id" : "bg102",
            "author" : "Ralls, Kim",
            "title" : "Midnight Rain",
            "genre" : "Fantasy",
            "price" : 5.95,
            "description" : "A former architect battles corporate zombies"
        }
    ]
}
However, there are a few differences that distinguish it from objects:
Of course, no methods – just data, so they have only properties
We write the names of the keys in quotes
No comments
No single quotes – only double
After the last property can not be a comma (in js can be)
We write texts in one line – even multi-line ones. We need to include some new line characters here, which we will then convert accordingly.
If JSON resembles JS objects, does working on them also resemble work on JS objects? Of course:
function myFunction(resp) {
    resp.forEach(function(book) {

        //book to nasz obiekt
        const id = book.id;
        const author = book.author;
        const title = book.title;
        const genre = book.genre;
        const price = book.price;
        const description = book.description;

        //lub za pomocą dekompozycji w ES6
        {id, author, title, genre, price, description} = book;
    }
}
The json format is most often saved in files with the .json extension.
To check the correctness of our JSON, just use the tool https://jsonlint.com/.
As part of the mini training, use this tool and correct the JSON below:
{
    "data" : {
            "id" : 1000,
            'name' : "John",
            "surname" : "Doe",
            "user_type" : "admin",
            "privilages" : [
                "edit_post",
                "add_post",
                'delete_post'
                'delte_user',
                'edit_user'
            ]
        },
}
JSON Object
When working with the JSON format in JS, the JSON object is very helpful. This is not the type of object (so we do not use it with new), and a single object that gives us 2 methods: stringify and parse. The first one converts the object into a textual format. The second one changes the encoded text into the JS object:
const ob = {
    name : "Jane",
    subname : "Doe"
}

const obStr = JSON.stringify(ob);
console.log(obStr); //"{"name":"Jane","subname":"Doe"}"

console.log( JSON.parse(obStr) ); //our previous object
What can it be useful for? In the case of Ajax, we will use it to send data to the server in JSON format. Sending simple unquoted data is not a problem – we will do it traditionally. However, if you want to send data that is nested (eg object in the object), then without JSON.stringify you will not get around. Another practical application of a JSON object is working with dataset, where data is stored as a string, so when you want to store an object there, you must replace it with a text entry.
const ob = {
    name : "Jane",
    subname : "Doe",
    car : {
        brand : "Fiat",
        color: "red"
    }
}


//example of dataset
element.dataset.info = ob; //no conversion
console.log(element.dataset.info); //[object Object]

element.dataset.info = JSON.stringify(ob); //no conversion
console.log(JSON.parse(element.dataset.info)); //above object


//ajax example
//we can send it this way
$.ajax({
    url : '...',
    data : {
        name : "Jane",
        subname : "Doe",
        car : {
            brand : "Fiat",
            color: "red"
        }
    }
});

//but this way we can do it
$.ajax({
    url : '...',
    contentType : 'application/json',
    data : JSON.stringify(ob);
});
How to connect
When Ajax was created, our choice was quite limited.
We had access to the XMLHtppRequest object and basically that. Working with this object is not always the most convenient (and maybe it is convenient, only with larger projects would some wrapper be used to make everything stick better), which is why very quickly various types of overlays were created.
One of the most-used is ajax in jQuery, which implementation provides fabulously easy to use methods for playing with asynchronous connections (xhr).
Nowadays, fashion is criticizing jQuery (which I am an opponent of), so there are a few additional solutions that are worth using.
The most popular ways to handle asynchronous connections are:
jQuery and its ajax
Axios
superagent
fetch
Ajax in jQuery we will deal in the section about jQuery.
In this section we will focus on native solutions provided by clean JS.
To handle AJAX in pure Javascript, we use one of two methods: we use XMLHttpRequest () or api called Fetch. But in a minute, because …
Downloading data and CORS
… Because we have to talk a little bit more.
To download and send data, we must have a place where we will connect.
I say straight away – “lazy” approach will not work. If you make your pages as html files on your desktop (or any directory on the disk) and you want to dynamically download a file that lies right next to our html file (or maybe somewhere else on the disk) dynamically, then you will not succeed.
Browsers nowadays have security features in order to not be able to download data from anywhere – including directly from the computer disk. It does not matter that you will use relative paths, you will show the perfect place on the disk – you can not.
But why not actually?
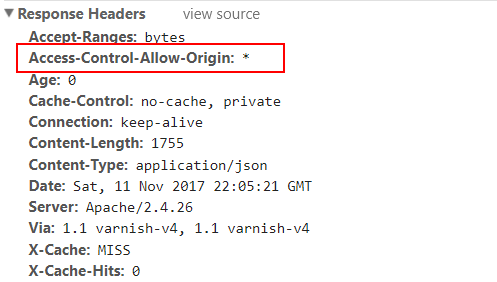
It comes with CORS – Cross-Origin Resource Sharing.
XHR connections (i.e., these asynchronous ones) can normally be performed only within your own domain (eg as the author of this website I can only connect to my http://codingnotes.eu server, which is located on the same domain), or to servers that clearly let you know that you can download data from them.
And how do they let you know? By sending the appropriate heading:
Access-Control-Allow-Origin “*”
Access-Control-Allow-Methods: “GET, POST, OPTIONS, DELETE, PUT”
Enable / disable syntax coloring
The first header indicates domains that can make dynamic connections to this server. An asterisk stands for any domain. The second heading identifies the possible connection types.
Below is an example of a response from one of the public api:
In many cases, when you connect to a website to download data, an ominous message will appear in your console:

It means that you can not dynamically connect to the server.
If you know well that the address is correct and you should be able to connect, you will be tormenting the server administrators at once,
because they probably gave the body and did not send you the appropriate headers … We return to our files on the desktop for a moment.
Do you already know why you can not download the file that is next to you? Just for the same reason – CORS.
The data is not served from any domain (and what is the domain beginning with file …) and the browser blocks it.
Local server
To be able to download / send data, you must serve it from some server. As part of the test, we will often use https://jsonplaceholder.typicode.com/, i.e. an example API that provides us with test data. There are plenty of such sample APIs and it’s very easy to find them on the net. Just type in “public api” in google. Nasa has its own, some ministries of weather, etc. Here you have an example list of free api you can download data from. If you want to work on your own data, then you have to install your own server – it can be local. I personally use PHP. That’s why I have an XAMPP local server installed on my computer. The installation process is described in this article. In the article I use virtual hosts, but I do not need this. All you need to do is act on your local list. Then add the .htaccess file with the content to the main page directory (htdocs) Header add Access-Control-Allow-Origin “*” Header add Access-Control-Allow-Methods: “GET, POST, OPTIONS, DELETE, PUT”
Thanks to this, there will be no problems with connections. If we enable such a server, we will be able to download data by connecting to http: // localhost or to http://127.0.0.1
But this is not the only possible approach. For example, you can use NodeJS and Express for the server, which also have appropriate extensions to send such headers. An example of how to build a simple API can be found at https://scotch.io/tutorials/build-a-restful-api-using-node-and-express-4 (good site at all, so I recommend reading).
There are also other methods to deal with CORS. Most of them depend on the particular technology used.
There are also simple – temporary solutions – such as browser add-ons that allow you to disable these security features.
For example, for Chrome, this one and for Firefox, for example this one. For the rest of the browsers, it’s easy to find something to look for “browser name disable cors plugin”.
Do I recommend this approach? When you need to test something quickly – it will work. But remember that in most cases the user will not have such an extension installed, so you do not really solve the problem.
I prepared you a mini starter for the above method.
You can download it here. It contains simple data for users in the json format, which I prepared using this tool.
The package is readme.md, in which it describes how to fire it. Of course, this requires NodeJS installed.
json-server
Do not kid yourself. The above methods are labor intensive. Even if you download the above package, before you add anything, you will have to write a bit.
Another option is to use json-server. It is a ready-made tool that gives us all the functions of adding, editing, loading, etc.
We install our server globally on the entire computer with the command:
npm install json-server -g
 We can now fire it in any directory using the following command:
json-server --watch filename.jsonWhere file-name.json is a json file that will be our pseudo database. For example, if we wanted to have 2 tables with users and movies in our API, then such a file could have the form:
{
    "users" : [
        {
            "id" : 0,
            "name" : "Mary",
            "surname" : "White"
        },
        {
            "id" : 0,
            "name" : "Carl",
            "surname" : "Thompson"
        }
    ],
    "movies" : [
        {
            "id" : 0,
            "name" : "Gayver",
            "genre" : "sf"
        },
        {
            "id" : 1,
            "name" : "Titanic",
            "surname" : "romance"
        }
    ]
}
After activating such a server, the console will display links to which we can connect:
Resources
http://localhost:3000/users
http://localhost:3000/movies

Home
http://localhost:3000
So you can create an index.html file (anywhere) and download the data:
fetch('http://localhost:3000/users')
    .then(res = > res.json())
    .then(res => {
        console.log(res)
    })
But here comes another matter. The browser and such data downloading can be blocked because you fire your index.html directly from the disk. Again – one of many solutions will come to your aid. Either start the html through the webstorm (icons in the upper right corner of the editor), either use the local server, or use browsersync, or – possibly the easiest solution at the beginning – install an http-server.
npm i http-sever -gAfter installing the latter, you go to the directory with the html file and start the command:
http-server . -c-1The console will show you the address at which the mini local server was launched and on which your html file will be opened. Remember that normally the main file opened on each server is usually index.html. If your file is named differently, then you must add its name to the address.
http://192.168.0.300:8080  //index.html
http://192.168.0.300:8080/website.html  //website.html
Excercise
Below are a few tasks that you can do as part of the exercise:
Install the json-server on your computer. Create a file with a simple 5-10 user database that you will generate using a https://www.json-generator.com/. Remember that the user table in such a file should be assigned to some property, e.g. { “users”: [ … ] }
Check the above json using the tool https://jsonlint.com/
After launching the server (check if he wrote the correct linking addresses in the console) create a html file on the desktop, and use the following code to download the data: fetch ( ‘http: // localhost: 3000 / users’) .then (res => res.json ()) .then (res => { console.log (res) })
For those who are willing: install yourself an xampp. In the htdocs directory, place the json file that you generated in the above tasks.
Create a html file on the desktop and use the following listing to try to download the json file that you just created:
fetch ( ‘http: //localhost/plik.json’)
.then (res => res.json ())
.then (res => {
console.log (res)
})
Enable / disable syntax coloring
If the connection fails, add a .htaccess file to the json directory, where you will place a record that will add the relevant CORS headers