Child Theme is a must in Worpress
Let’s answer why Child Theme is a must in Worpress:
#child theme
Simply put, Child Theme is a copy of the template you use. It is used to save custom changes in template files, e.g. css or php.
#why
Child theme allows you to safely modify the original theme without the risk that after updating the template, our changes will be removed. This way, we can modify the template files and simultaneously update it to the latest version without stress that our modifications will be removed. How to create a Child Theme?
#how
Creating a child theme for the selected template is a few minutes job. In the network you can find One-Click Child Theme plugins that allow you to create a child theme from the administration panel. However, I would like to show you a manual method ( also rly fast ).
1. Log in to the FTP server with WordPress.
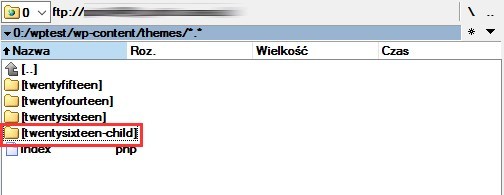
2. Go to the WordPress directory, and then go to the subfolder / wp-content / themes /.
3. Check the name of the folder with the template you are currently using. Then create a new directory and name it xxxx-child, where xxxx is the name of the original template. For example, if the original template is in the twentysixteen folder, the new folder for the child theme should be named twentysixteen-child.

4. Enter the folder with the child template. Create a new file here named style.css. Then open it using the HTML / CSS editor (eg Notepad ++) and enter the following content in it:
/*
Theme Name: Twentysixteen – Child Theme
Theme URI:
Description: Twentysixteen Child Theme
Author: Aga
Template: twentysixteen
*/
5. Save the style.css file.
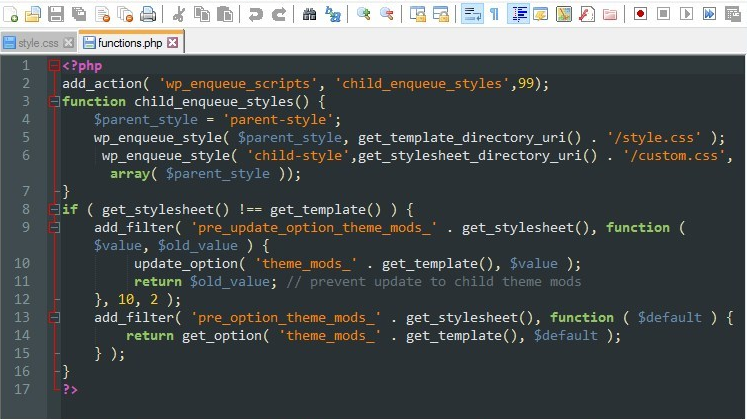
6. Create another file, this time calling it functions.php. Then open it with Notepad or Notepad ++ and paste the following fragment in it:
1 2 3 4 5 6 7 8 9 10 11 12 13 14 15 16 17 |
<?php
add_action( 'wp_enqueue_scripts', 'child_enqueue_styles',99);
function child_enqueue_styles() {
    $parent_style = 'parent-style';
    wp_enqueue_style( $parent_style, get_template_directory_uri() . '/style.css' );
	 wp_enqueue_style( 'child-style',get_stylesheet_directory_uri() . '/custom.css', array( $parent_style ));
}
if ( get_stylesheet() !== get_template() ) {
    add_filter( 'pre_update_option_theme_mods_' . get_stylesheet(), function ( $value, $old_value ) {
         update_option( 'theme_mods_' . get_template(), $value );
         return $old_value; // prevent update to child theme mods
    }, 10, 2 );
    add_filter( 'pre_option_theme_mods_' . get_stylesheet(), function ( $default ) {
        return get_option( 'theme_mods_' . get_template(), $default );
    } );
}
?>
|

7. Save the functions.php file.
 In the directory with child theme, you should now have two files - style.css and functions.php.
 You can now log out of the FTP server. Now, all we have to do is activate the child theme.
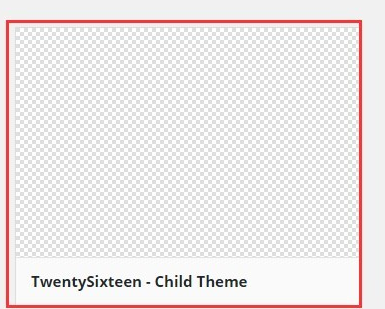
 To do this, go to the WordPress panel, and then go to the "Appearance> Themes" tab.
 The list of themes will display an additional child theme with the name chosen by us,
 which we have entered in the style.css file.
 Just choose a theme and set it as the default one.

From now on, we use the child theme.
If we want to make any changes to the files of the original template,
then first copy such files from the original folder to the folder with our Child Theme,
and then modify them there.
The original files will remain intact and will still be overwritten by the child theme files
with our individual changes.
No template update will delete our modifications.
Hope you learned something new
If you learned something new from this tutorial or if you have any question let me know in comments section.
You can also check my other topic Free stock photos websites, icons, patterns.
